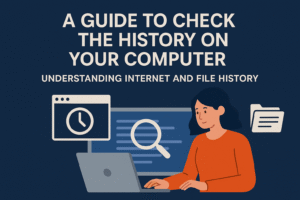
A Guide to Check the History on Your Computer: Understanding Internet and File History
In today’s digital age, managing your computer’s history is essential for productivity and privacy. A guide to check the history on your computer will help you navigate the tools available for tracking internet history and file history. Knowing how to check these histories allows you to recover lost data, revisit previous websites, and maintain a clean digital space.
This guide covers how to access both internet browsing history and file history, as well as tips on clearing unnecessary data and managing your history effectively.
I. Internet History: Tracking Your Web Activity

A Guide to Check the History on Your Computer can also be applied to your internet browsing habits. Browsers store information about the websites you visit, cached images, and other data to help you return to websites easily. Let’s dive into how you can check your internet browsing history in popular browsers.
1. Checking Google Chrome’s Internet History

Google Chrome is the most widely used browser, and it automatically saves a detailed record of your browsing activity. Accessing your internet history in Chrome is quick and straightforward.
How to Check Chrome’s Internet History:
-
Open Chrome: Launch Google Chrome on your device.
-
Navigate to History: Click the three dots in the top-right corner and select History (or press
Ctrl + H). -
View Your History: A page will display a list of websites you’ve visited. You can search for specific sites or scroll through the entries.
-
Clear History: If you wish to delete history, click Clear browsing data, select the types of data you want to delete (e.g., browsing history, cached images), and hit Clear Data.
Why It’s Useful:
Checking your browsing history in Chrome helps you access previously visited sites quickly. You can also clear history to protect privacy. For more information, visit Google Chrome Help.
2. Reviewing Firefox’s Internet History

Mozilla Firefox is known for offering great privacy features and customization options. You can quickly review your internet history in Firefox.
How to Check Firefox’s Internet History:
-
Open Firefox: Launch Mozilla Firefox.
-
Access History: Click on the three lines in the top-right corner, select History, and click Show All History.
-
Search Your History: You can search for a specific site or filter by date to view your browsing activity.
-
Clear History: To delete history, select Clear Recent History and choose the data you wish to clear (e.g., browsing history, cookies).
Why It’s Useful:
Accessing and clearing browsing history in Firefox is useful for protecting your online privacy. To learn more, check out the Mozilla Firefox Help.
3. Accessing Microsoft Edge History

Microsoft Edge is a fast-growing browser that integrates seamlessly with Windows. Checking your internet history in Edge is as simple as the previous browsers.
How to Check Edge’s Internet History:
-
Open Edge: Launch Microsoft Edge.
-
Go to History: Click the three dots in the top-right corner and select History (or press
Ctrl + H). -
View History: A panel will display all your visited sites. You can sort by date or use the search bar to find specific websites.
-
Clear History: To remove your browsing history, click Clear browsing data and select what you want to delete.
Why It’s Useful:
Accessing your browsing history allows you to revisit websites without the need to search for them again. Learn more at Microsoft Edge Support.
4. Checking Safari’s History (macOS)

A Guide to Check the History on Your Computer Safari, the default browser on macOS, is known for its speed and efficiency. Checking your internet history on Safari is straightforward.
How to Check Safari’s Internet History:
-
Open Safari: Launch Safari on your Mac.
-
View History: Click History in the menu bar and select Show All History.
-
Search Your History: You can use the search bar to find specific websites you’ve visited.
-
Clear History: If you need to clear history, click Clear History in the History menu.
Why It’s Useful:
Checking browsing history on Safari makes it easy to revisit websites quickly. For more information, check out Apple’s Safari Help.
II. File History: Tracking Your Files and Documents
![]()
A Guide to Check the History on Your Computer In addition to internet history, it’s essential to understand how to check file history on your computer. This includes viewing recently accessed documents, recovering lost files, and checking modifications made to files. Let’s explore how you can manage and check your file history on Windows and macOS.
1. Viewing File History on Windows
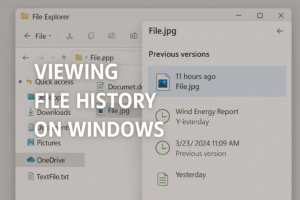
A Guide to Check the History on Your Computer Windows offers several tools for accessing file history. The Quick Access feature shows recently accessed files and folders, while File History helps you recover previous versions of files.
How to Check File History on Windows:
-
Open File Explorer: Press
Windows + Eto open File Explorer. -
Quick Access: In the left panel, under Quick Access, you can view recently opened files and folders.
-
File History: To access File History, go to Control Panel > System and Security > File History.
-
Restore Files: Right-click a file and select Restore previous versions to recover earlier versions.
Why It’s Useful:
This feature is great for recovering lost documents or accessing older file versions. For more guidance, visit Microsoft’s File History Support.
2. Reviewing File History on macOS

A Guide to Check the History on Your Computer macOS provides Time Machine, an efficient backup system that automatically tracks and stores changes to files, allowing users to recover previous versions.
How to Check File History on macOS:
-
Open Finder: Click on the Finder icon in the dock.
-
Recents: Select Recents from the sidebar to view files you’ve recently accessed.
-
Time Machine: To restore previous versions of a file, open Time Machine from the menu bar, then navigate through the timeline to recover your file.
-
Restore Files: Select a file and click Restore to revert to an earlier version.
Why It’s Useful:
Time Machine ensures that files are always recoverable, even if they’re deleted or modified. For more on using Time Machine, refer to Apple’s Time Machine Guide.
III. Why and When to Clear Your History
A Guide to Check the History on Your Computer Clearing your internet browsing history and file history is important for maintaining privacy, protecting your data, and improving system performance. Here’s why you might want to clear your history:
-
Privacy Protection: Prevent others from seeing your browsing habits or accessing private documents.
-
Security: Cached data and history files might store sensitive information, so clearing them ensures your data remains protected.
-
Performance: Deleting unnecessary history frees up storage space and helps improve your computer’s speed.
How to Clear History:
-
In most browsers, you can access Settings to clear browsing data such as cache, cookies, and history.
-
On both Windows and macOS, you can manage file history through File Explorer or Time Machine. Disabling or clearing history periodically is beneficial for freeing up storage space.
IV. Best Practices for Managing Your History
A Guide to Check the History on Your Computer Now that you know how to check your history and when to clear it, here are some best practices for effectively managing your computer’s history:
-
Clear Browsing History Regularly: Set a reminder to clear your history, especially when using shared or public devices.
-
Use Incognito or Private Browsing: If you don’t want your browsing activity to be saved, use your browser’s incognito or private browsing mode.
-
Enable Backup Systems: Use File History (Windows) or Time Machine (macOS) for automatic backups of important files.
-
Organize Files Efficiently: Create folders and organize documents by category, reducing the need to rely on recent file history.
ALSO SEE: Windows 11 Features: A New Era of PC Experience
Conclusion
A Guide to Check the History on Your Computer is essential for managing your browsing activity and file history. Whether you’re trying to recover a file, revisit a website, or ensure your privacy, understanding how to check and manage your history can make your computer usage more efficient and secure. By following this guide, you can better organize your files, protect your privacy, and optimize your computer’s performance.